[TOC]
说明: 下列文章主要对尚硅谷《SpringBoot视频教程》的总结,下列文字描述来源他们的课件。
视频地址: https://www.bilibili.com/video/av38657363/?p=9
spingboot版本2.1.5.RELEASE
JDBC
pom.xml
<dependency>
      <groupId>org.springframework.boot</groupId>
      <artifactId>spring-boot-starter-jdbc</artifactId>
      <scope>compile</scope>
 </dependency>
 <dependency>
      <groupId>mysql</groupId>
      <artifactId>mysql-connector-java</artifactId>
      <scope>runtime</scope>
</dependency>
数据源配置
spring:
  datasource:
    username: root
    password: 123456
    url: jdbc:mysql://localhost:3306/work?useUnicode=true&characterEncoding=utf-8 #中文乱码问题
    driver-class-name: com.mysql.cj.jdbc.Driver
    sql-script-encoding: utf-8
    schema:
    - classpath*:sql/school.sql #
    # - classpath*:sql/school2.sql
    initialization-mode: always # 保证去自动执行上面对应的sql语句
初始化sql脚本
DROP TABLE IF EXISTS  work.school;
-- Create the table in the specified schema
CREATE TABLE work.school
(
  id INT NOT NULL PRIMARY KEY,
  -- primary key column
  name NVARCHAR(50) NOT NULL,
  address NVARCHAR(50) NOT NULL
  -- specify more columns here
);


INSERT INTO work.school
  ( -- columns to insert data into
  id, name, address
  )
VALUES
  (
    1, "中文1号", "湖南"
),
  (
    2, "中文2号", "深圳"
);
JdbcTemplate模板
@Autowired
private JdbcTemplate jdbcTemplate;

@GetMapping(value = { "/school", "/" })
public List<Map<String, Object>> getMethodName() throws SQLException {
    List<Map<String, Object>> result = jdbcTemplate.queryForList("select * from school");
    return result;
}
连接mycat
需要把版本改成5.xx
<dependency>
      <groupId>mysql</groupId>
      <artifactId>mysql-connector-java</artifactId>
      <scope>runtime</scope>
      <version>5.1.34</version>
 </dependency>
不然会出现 SQLNonTransientConnectionException: CLIENT_PLUGIN_AUTH is required 这个错误。
application.yml
同时连接mycat也就相当于连接另一个单机数据库一样就ok了。如下:
spring:
  datasource:
    username: root
    password: 123456
    url: jdbc:mysql://localhost:32769/workdb?useUnicode=true&characterEncoding=utf-8
    driver-class-name: com.mysql.jdbc.Driver
    sql-script-encoding: utf-8
    schema:
    - classpath*:sql/school.sql
    initialization-mode: always
配置druid数据源
好处,用于监控sql执行速度,url的访问等数据。
pom.xml
<dependency>
			<groupId>com.alibaba</groupId>
			<artifactId>druid-spring-boot-starter</artifactId>
			<version>1.1.17</version>
</dependency>
application.yml
spring:
  datasource:
    username: root
    password: 123456
    url: jdbc:mysql://localhost:32769/workdb?useUnicode=true&characterEncoding=utf-8
    driver-class-name: com.mysql.jdbc.Driver
    sql-script-encoding: utf-8
    schema:
    - classpath*:sql/school.sql
    initialization-mode: always
    type: com.alibaba.druid.pool.DruidDataSource
    druid:
      initialSize: 5
      minIdle: 5
      maxActive: 20
      # 配置获取连接等待超时的时间
      maxWait: 60000
      # 配置间隔多久才进行一次检测,检测需要关闭的空闲连接,单位是毫秒
      timeBetweenEvictionRunsMillis: 60000
      # 配置一个连接在池中最小生存的时间,单位是毫秒
      minEvictableIdleTimeMillis: 300000
      validationQuery: SELECT 1 FROM DUAL
      testWhileIdle: true
      testOnBorrow: false
      testOnReturn: false
      # 打开PSCache,并且指定每个连接上PSCache的大小
      poolPreparedStatements: true
      maxPoolPreparedStatementPerConnectionSize: 20
      # 通过connectProperties属性来打开mergeSql功能;慢SQL记录
      connectionProperties: druid.stat.mergeSql=true;druid.stat.slowSqlMillis=5000
      # 合并多个DruidDataSource的监控数据
      useGlobalDataSourceStat: true
      # 配置监控统计拦截的filters,去掉后监控界面sql无法统计,'wall'用于防火墙  filters: stat:统计,wall 防火墙,
      filter:
        stat:
          enabled: true  #和以前版本有区别
        wall:
          enabled: true  #和以前版本有区别
Druid管理页面配置
@Configuration
public class DruidConfig {
    /***
     *
     * @return  配置Druid的监控,配置一个管理后台的Servlet
     */
    @Bean
    public ServletRegistrationBean statViewServlet() {
        ServletRegistrationBean bean = new ServletRegistrationBean(new StatViewServlet(), "/druid/*");
        Map<String, String> initParams = new HashMap<>();

        initParams.put("loginUsername", "admin");
        initParams.put("loginPassword", "admin");
        initParams.put("allow", "");// IP白名单 (没有配置或者为空,则允许所有访问)
        initParams.put("deny", "192.168.15.21"); //IP黑名单 (存在共同时,deny优先于allow)

        bean.setInitParameters(initParams);
        return bean;
    }

    /***
     *
     *   配置一个web监控的filter, 过滤对应的格式
     * */
    @Bean
    public FilterRegistrationBean webStatFilter() {
        FilterRegistrationBean bean = new FilterRegistrationBean();
        bean.setFilter(new WebStatFilter());
        Map<String, String> initParams = new HashMap<>();
        initParams.put("exclusions", "*.js,*.gif,*.jpg,*.bmp,*.png,*.css,*.ico,/druid/*");
        bean.setInitParameters(initParams);
        bean.setUrlPatterns(Arrays.asList("/*"));
        return bean;
    }
 }
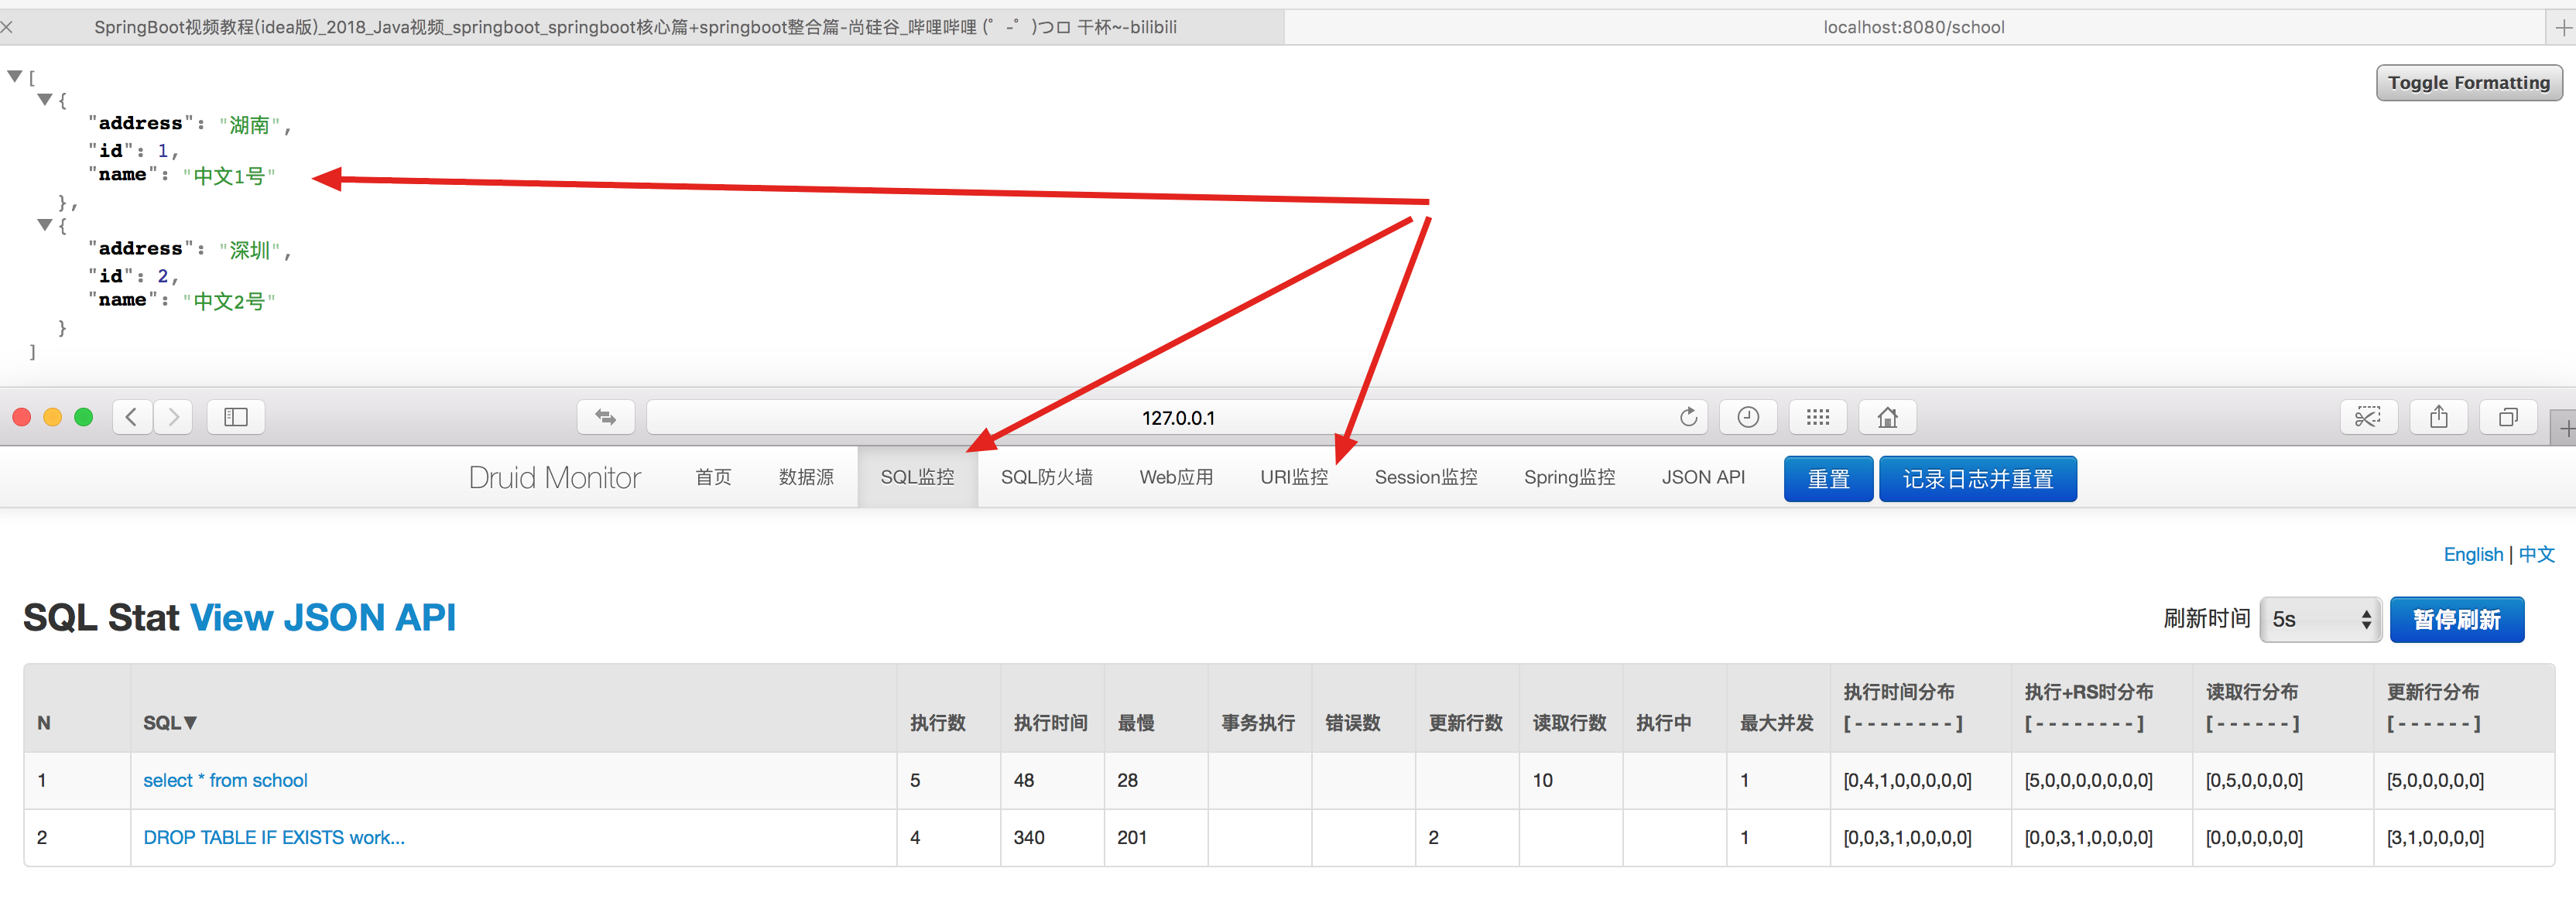
效果如下

注意:他可以查看你系统中所有的数据操作,然后可以看到你执行比较慢的sql语句等。
MyBatis
pom.xml
<dependency>
      <groupId>org.mybatis.spring.boot</groupId>
      <artifactId>mybatis-spring-boot-starter</artifactId>
      <version>2.0.1</version>
      <scope>compile</scope>
 </dependency>
注解版
添加扫描Mapper
@MapperScan(value = "com.example.databasedemo.mybatis") // 扫描你mapper所在的文件夹
@SpringBootApplication
public class DemoApplication {

	public static void main(String[] args) {
		SpringApplication.run(DemoApplication.class, args);
	}
}
mapper-crud
这里的注解都是org.apache.ibatis这个包里面的,感觉就关联了myBatis了.
public interface SchoolMapper {

    @Select("select * from school where id=#{id}")
    public School getSchoolById(Integer id);

    @Delete("delete from school where id=#{id}")
    public int deleteSchoolById(Integer id);

    @Options(useGeneratedKeys = true,keyProperty = "id")
    @Insert("insert into school(name,address) values(#{name},#{address})")
    public int insertSchool(School school);

    @Update("update school set name=#{name} where id=#{id}")
    public int updateSchool(School school);
}
更多的注解可以操作复杂的处理
controller-RestFul风格
@RestController
public class MyBatisController {

    @Autowired
    private SchoolMapper schoolMapper;

    @GetMapping("/school/{id}")
    public School getSchool(@PathVariable("id") Integer id) {
        School school = schoolMapper.getSchoolById(id);
        return school;
    }

    @DeleteMapping("/school/{id}")
    public int delSchool(@PathVariable("id") int id) {
        int count = schoolMapper.deleteSchoolById(id);
        return count;
    }

    @PostMapping(value = "school")
    public int addSchool(@RequestBody School school) {
        int count = schoolMapper.insertSchool(school);
        return count;
    }

    @PutMapping(value = "school")
    public int putMethodName(@RequestBody School school) {
        int count = schoolMapper.updateSchool(school);
        return count;
    }

}
注意
前端请求传Json对象则后端使用@RequestParam;
前端请求传Json对象的字符串则后端使用@RequestBody。
总结: 可以看到,用注解版,操作非常简单。
配置文件版
mybatis:
  config-location: classpath:mybatis/mybatis-config.xml  #指定全局配置文件的位置
  mapper-locations: classpath:mybatis/mapper/*.xml   #指定sql映射文件的位置
注意mapper文件也是需要@mapper或者提供@MapperScan的。
配置文件xml
<?xml version="1.0" encoding="UTF-8"?>
<!DOCTYPE mapper PUBLIC "-//mybatis.org//DTD Mapper 3.0//EN" "http://mybatis.org/dtd/mybatis-3-mapper.dtd">
<mapper namespace="com.example.databasedemo.mybatis.SchoolXmlMapper">
    <select id="getSchoolById" resultType="com.example.databasedemo.mybatis.School">
         select * from school where id=#{id}
    </select>
</mapper>
springData
转载地址: https://blog.csdn.net/sinat_28050007/article/details/53290217
SpringData相关概念
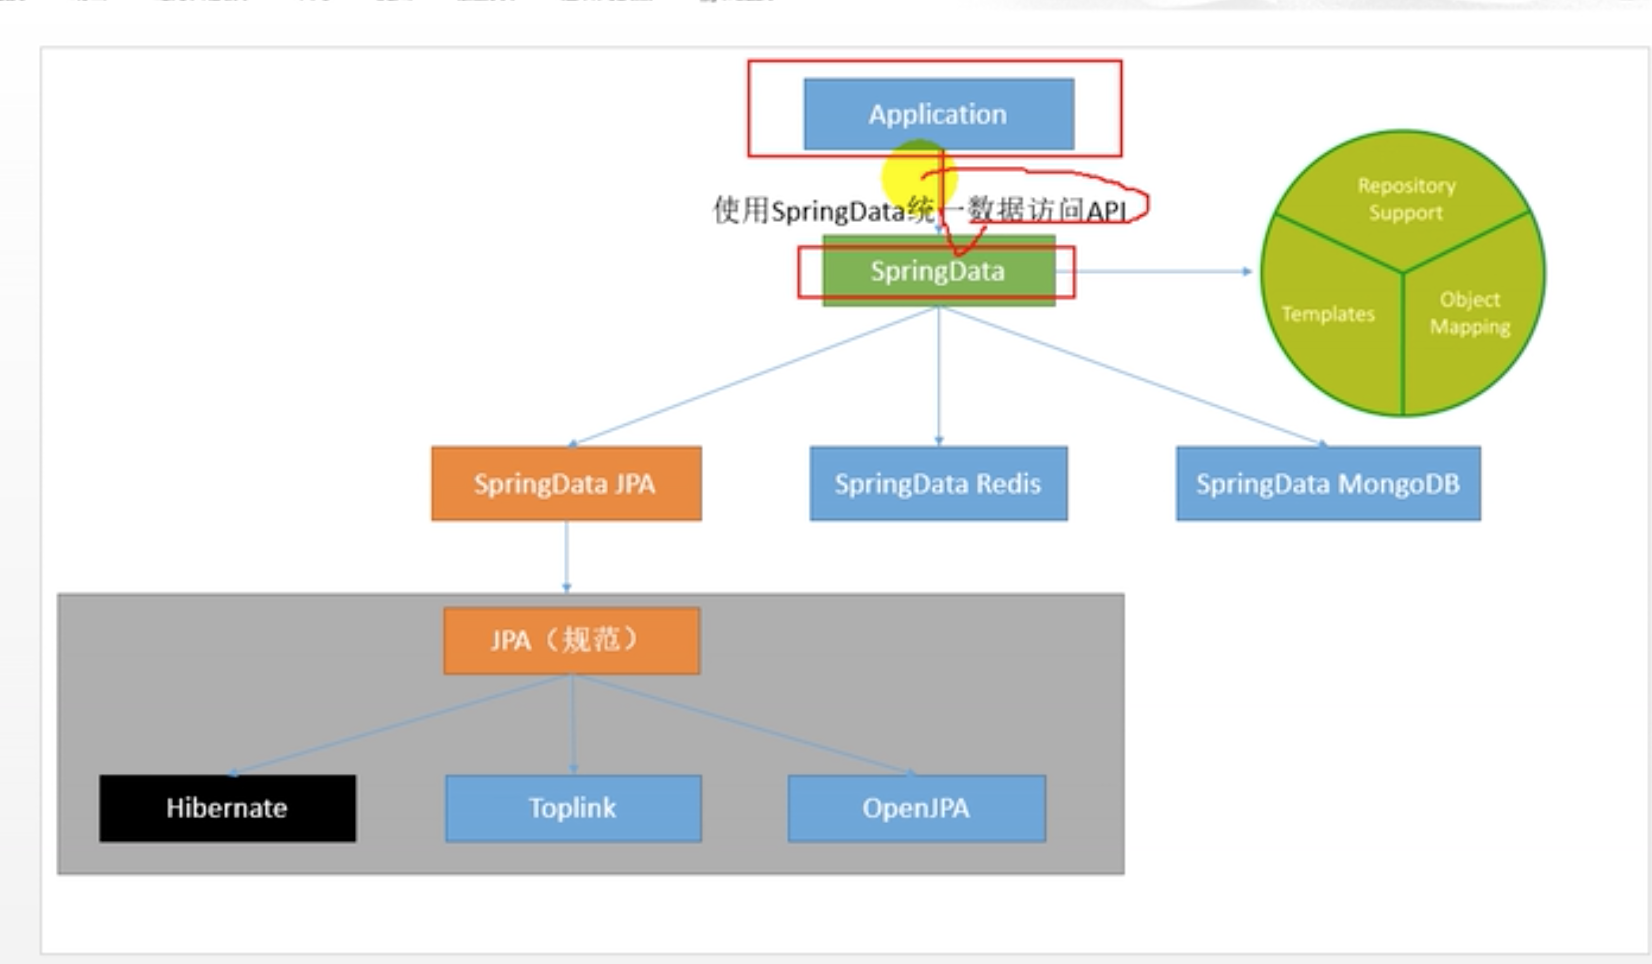
SpringData是Spring基于ORM框架、JPA规范封装的一套JPA应用框架,它提供了包括增删改查在内的常用功能,且易于扩展,可使开发者用极简的代码实现对数据库的访问和操作。
我们就在Application层进行操作

什么是JPA呢
JPA全称Java Persistence API,是sun提出的一个对象持久化规范,各JavaEE应用服务器自主选择具体实现。JPA仅仅只是一个规范,而不是产品;使用JPA本身是不能做到持久化的。所以,JPA只是一系列定义好的持久化操作的接口,在系统中使用时,需要真正的实现者。
JPA的底层实现是一些流行的开源ORM(对象关系映射)框架,因此JPA其实也就是java实体对象和关系型数据库建立起映射关系,通过面向对象编程的思想操作关系型数据库的规范。
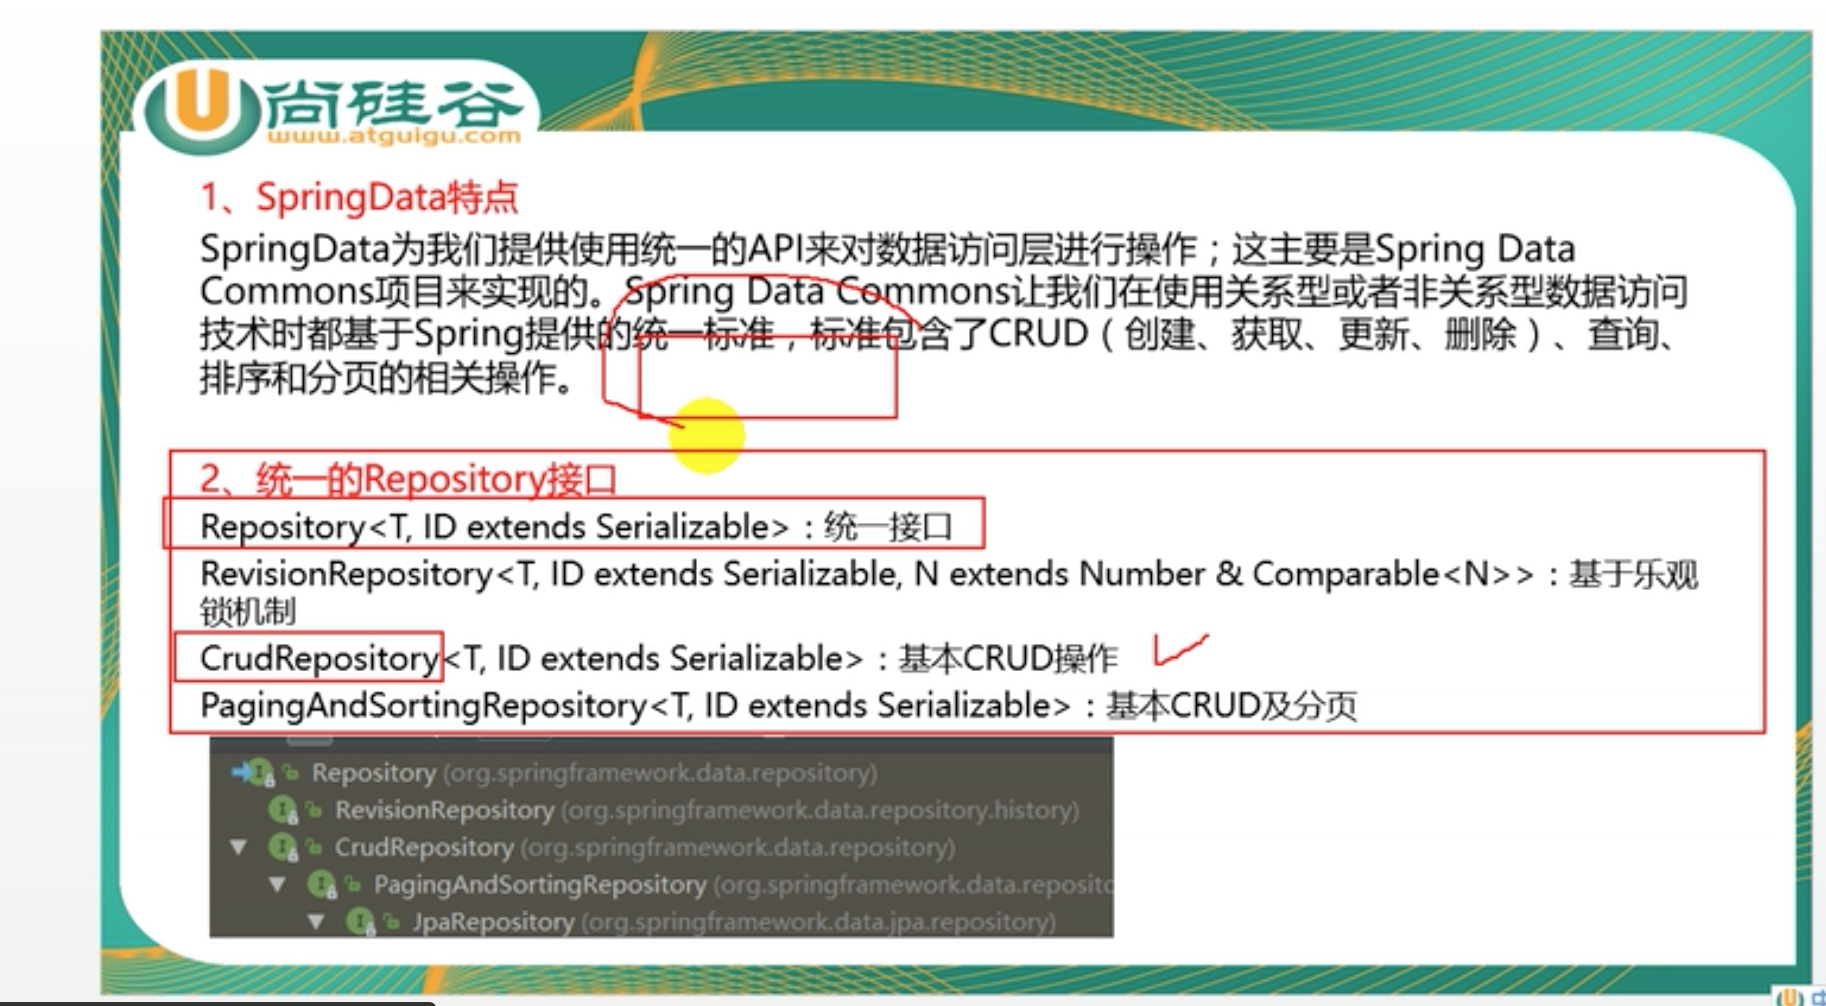
SpringData提供的编程接口
Repository:最顶层接口,是一个空接口,目的是为了统一所有的Repository的类型,且能让组件扫描的时候自动识别;
CrudRepository:提供基础的增删改查操作;
PagingAndSortingRepository:提供分页和排序的操作;
JpaRepository:增加了批量操作的功能;
JpaSpecificationExecutor :组合查询条件,提供原生SQL查询。

具体实现JPA
pom.xml
 <dependency>
      <groupId>org.springframework.boot</groupId>
      <artifactId>spring-boot-starter-data-jpa</artifactId>
      <scope>compile</scope>
  </dependency>
创建表
//使用JPA注解配置映射关系
@Entity //告诉JPA这是一个实体类(和数据表映射的类)
@Table(name = "tbl_user") //@Table来指定和哪个数据表对应;如果省略默认表名就是user;
@Data
public class User implements Serializable {

    @Id //这是一个主键
    @GeneratedValue(strategy = GenerationType.IDENTITY)//自增主键
    private Integer id;

    @Column(name = "last_name",length = 50) //这是和数据表对应的一个列
    private String lastName;
    @Column //省略默认列名就是属性名
    private String email;
}
mapper层
public interface UserRepository extends JpaRepository<User, Integer> {

}
Controller
@RestController
public class JpaController {

    @Autowired
    private UserRepository  userRepository;

    @GetMapping(value="/jpa/{id}")
    public User getUser(@PathVariable("id") Integer id) {
        Optional<User> optional = userRepository.findById(id);
        return optional.get();
    }

    @PostMapping(value="/jpa")
    public User addUser(@RequestBody User user) {
        User resultUser = userRepository.save(user);
        return resultUser;
    }

}
application.yml
spring:
  jpa:
    show-sql: true  #  控制台显示SQL
    hibernate:
      ddl-auto: update #更新或者创建数据表结构
  datasource:
    username: root
    password: 123456
    url: jdbc:mysql://localhost:32769/workdb?useUnicode=true&characterEncoding=utf-8
    driver-class-name: com.mysql.jdbc.Driver
    sql-script-encoding: utf-8
    type: com.alibaba.druid.pool.DruidDataSource
注意:这里集成了Druid,druid只是和数据源的配置,和其他的调用接口没关系,这里一样还是可以监控数据源,不需要做什么改动。
「真诚赞赏,手留余香」
真诚赞赏,手留余香
使用微信扫描二维码完成支付
