[TOC]
说明: 下列文章主要对尚硅谷《SpringBoot视频教程》的总结,下列文字描述来源他们的课件。
视频地址: https://www.bilibili.com/video/av38657363/?p=9
spingboot版本2.1.5.RELEASE
静态资源的映射规则
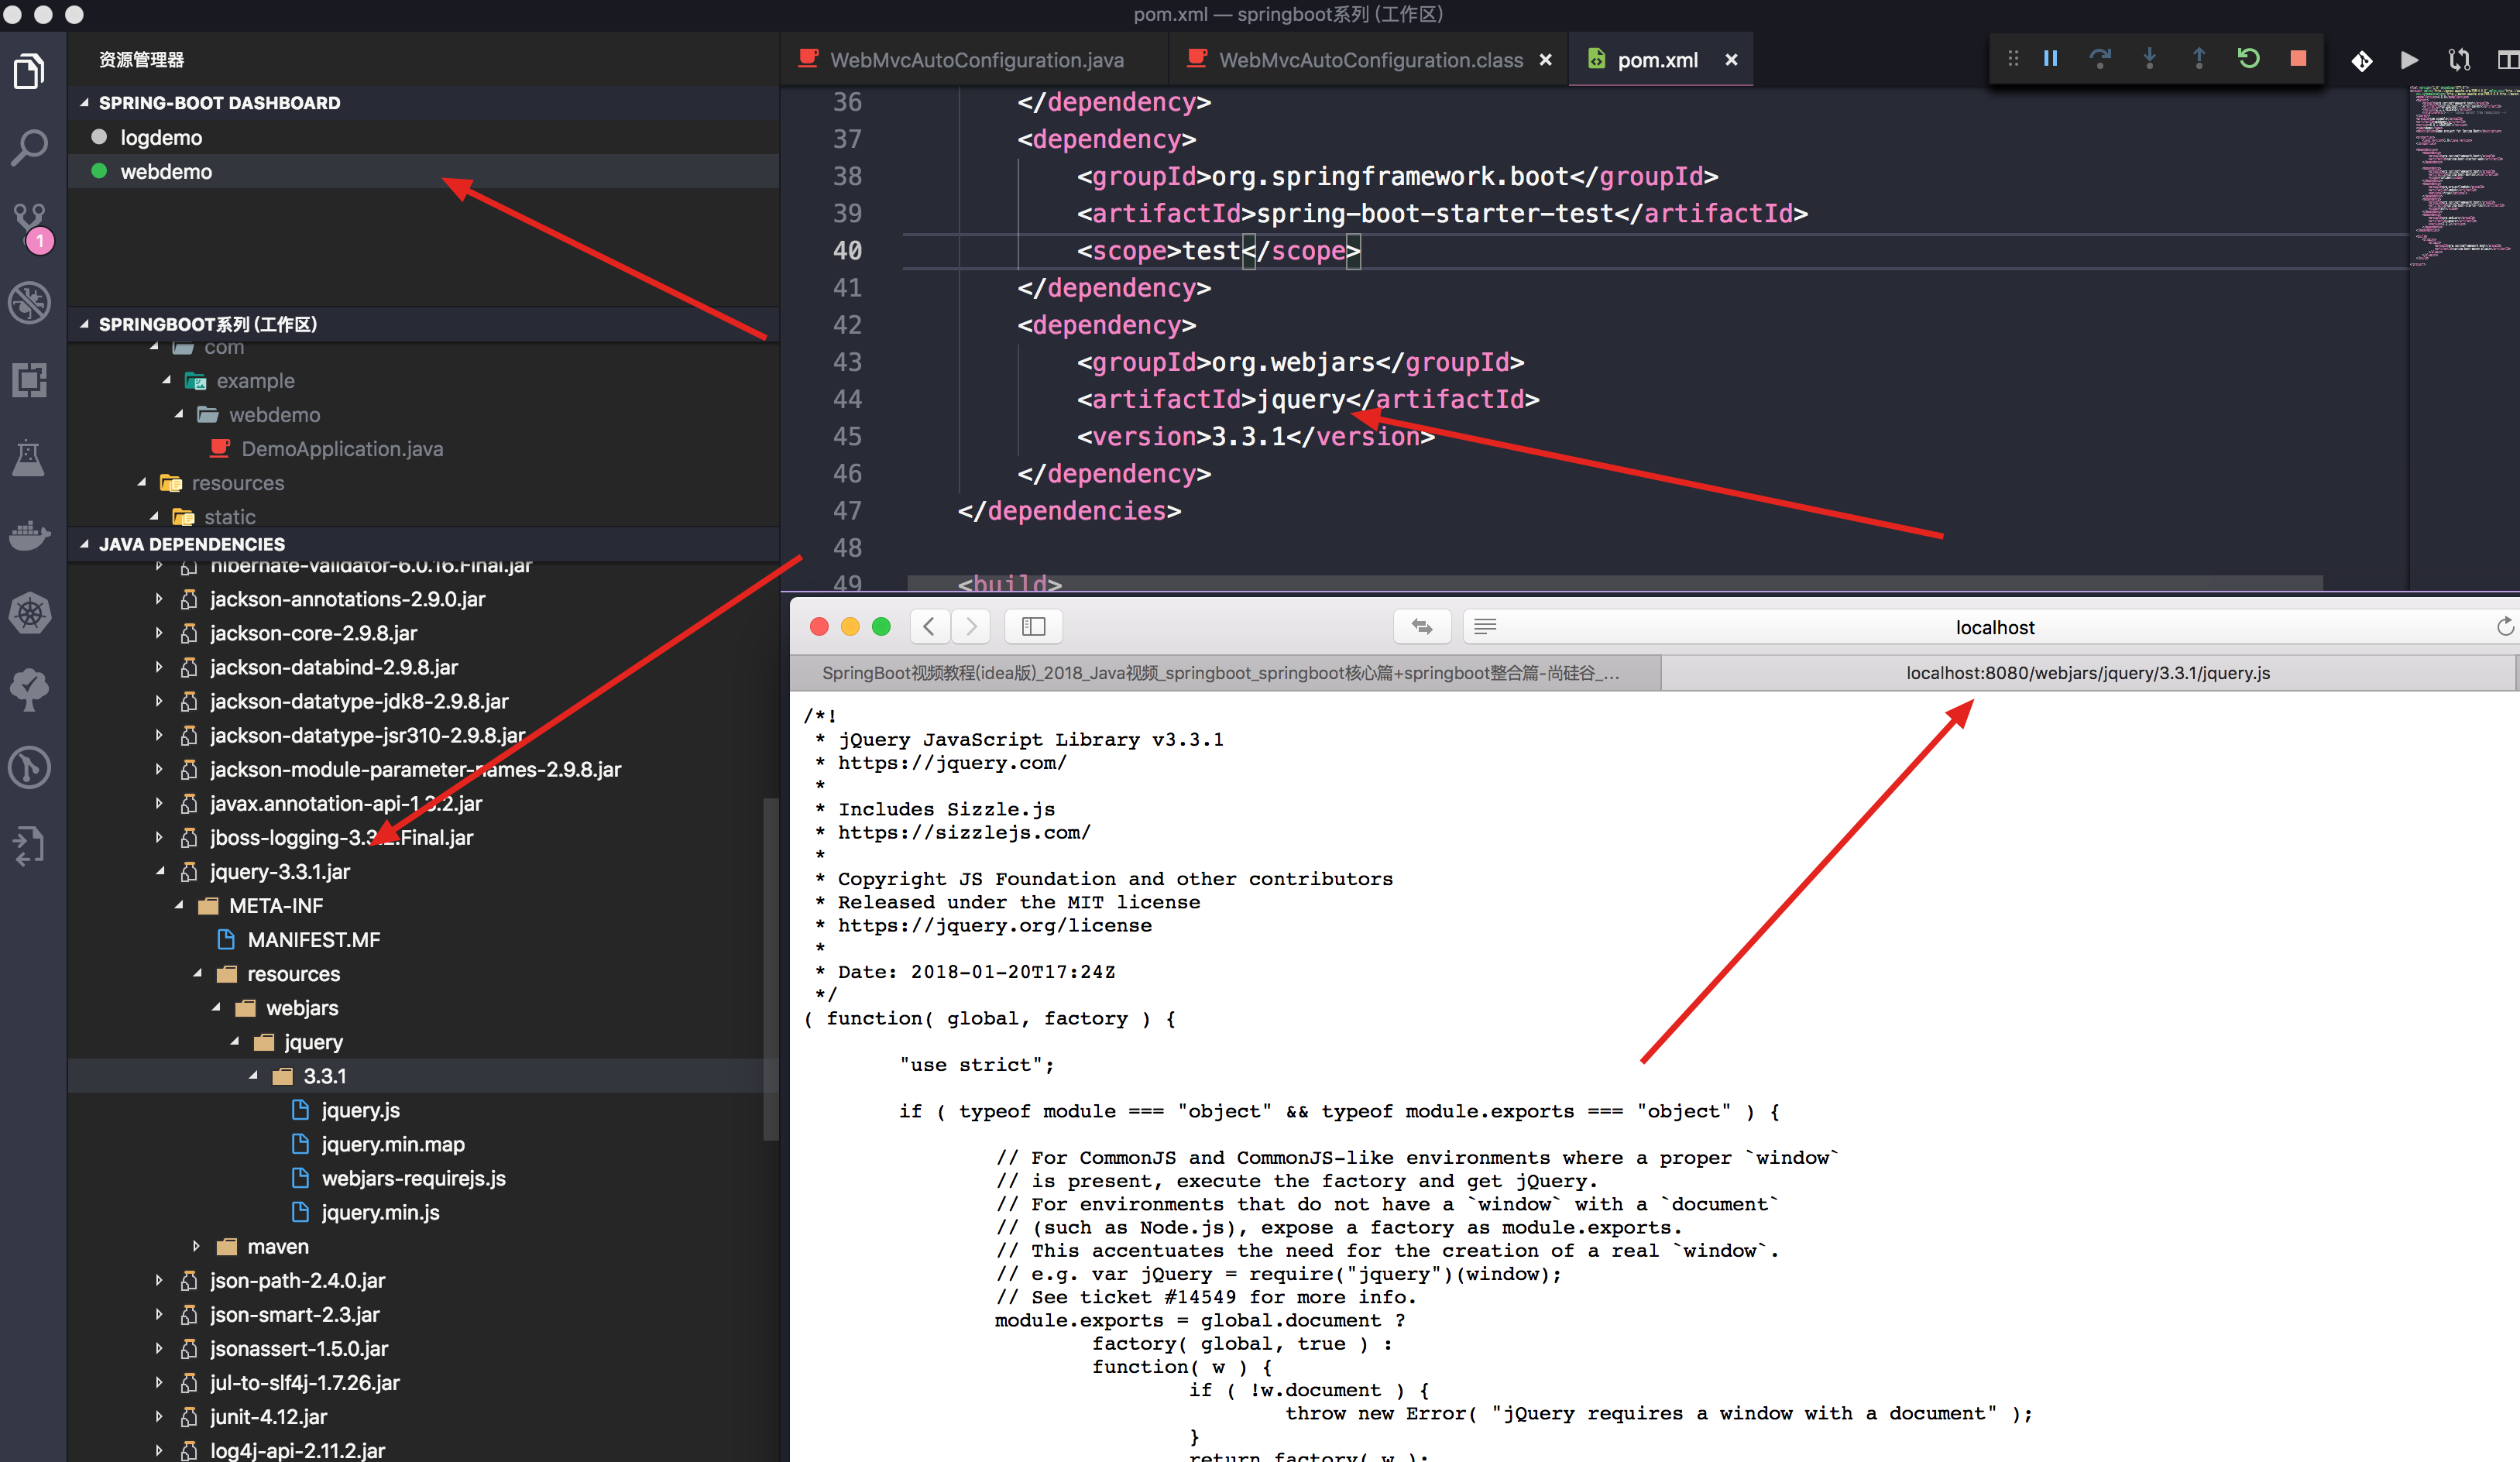
webjars
所有 /webjars/** ,都去 classpath:/META-INF/resources/webjars/ 找资源,webjars:以jar包的方式引入静态资源;
http://www.webjars.org/ 这里有很多前端的框架maven库。
jquery.js包导入
<!--引入jquery-webjar-->在访问的时候只需要写webjars下面资源的名称即可
		<dependency>
			<groupId>org.webjars</groupId>
			<artifactId>jquery</artifactId>
			<version>3.3.1</version>
		</dependency>
localhost:8080/webjars/jquery/3.3.1/jquery.js
默认静态资源的文件夹
"classpath:/META-INF/resources/",
"classpath:/resources/",
"classpath:/static/",
"classpath:/public/"
"/":当前项目的根路径
http://localhost:8080/temp.jpg 就直接到这些文件夹下面去找。
欢迎页面
欢迎页; 静态资源文件夹下的所有index.html页面;被"/**“映射;
localhost:8080/ 找index页面
favicon.ico图标
所有的 **/favicon.ico 都是在静态资源文件下找;
源码分析
spring-boot-autoconfigure.jar中package org.springframework.boot.autoconfigure.web.servlet;这个WebMvcAutoConfiguration类处理。
@Override
		public void addResourceHandlers(ResourceHandlerRegistry registry) {
			if (!this.resourceProperties.isAddMappings()) {
				logger.debug("Default resource handling disabled");
				return;
			}
			Integer cachePeriod = this.resourceProperties.getCachePeriod();
			if (!registry.hasMappingForPattern("/webjars/**")) {
				customizeResourceHandlerRegistration(
						registry.addResourceHandler("/webjars/**")
								.addResourceLocations(
										"classpath:/META-INF/resources/webjars/")
						.setCachePeriod(cachePeriod));
			}
			String staticPathPattern = this.mvcProperties.getStaticPathPattern();
       //静态资源文件夹映射
			if (!registry.hasMappingForPattern(staticPathPattern)) {
				customizeResourceHandlerRegistration(
						registry.addResourceHandler(staticPathPattern)
								.addResourceLocations(
                    //默认的静态文件夹,如下代码块-2
										this.resourceProperties.getStaticLocations())
						.setCachePeriod(cachePeriod));
			}
		}

    //配置欢迎页映射
		@Bean
		public WelcomePageHandlerMapping welcomePageHandlerMapping(
				ResourceProperties resourceProperties) {
			return new WelcomePageHandlerMapping(resourceProperties.getWelcomePage(),
					this.mvcProperties.getStaticPathPattern());
		}

    //配置喜欢的图标
		@Configuration
		@ConditionalOnProperty(value = "spring.mvc.favicon.enabled", matchIfMissing = true)
		public static class FaviconConfiguration {

			private final ResourceProperties resourceProperties;

			public FaviconConfiguration(ResourceProperties resourceProperties) {
				this.resourceProperties = resourceProperties;
			}

			@Bean
			public SimpleUrlHandlerMapping faviconHandlerMapping() {
				SimpleUrlHandlerMapping mapping = new SimpleUrlHandlerMapping();
				mapping.setOrder(Ordered.HIGHEST_PRECEDENCE + 1);
        //所有  **/favicon.ico
				mapping.setUrlMap(Collections.singletonMap("**/favicon.ico",
						faviconRequestHandler()));
				return mapping;
			}
		}
代码块-2
@ConfigurationProperties(prefix = "spring.resources", ignoreUnknownFields = false)
public class ResourceProperties {

	private static final String[] CLASSPATH_RESOURCE_LOCATIONS = {
			"classpath:/META-INF/resources/", "classpath:/resources/",
			"classpath:/static/", "classpath:/public/" };
修改路径
#如果修改了,原来的默认设置都不行了, 一般不修改。
spring.resources.static-locations*=classpath:/hello/
thymeleaf模板引擎
默认配置
spring-boot-autoconfigure.jar中package org.springframework.boot.autoconfigure.thymeleaf;
@ConfigurationProperties(prefix = "spring.thymeleaf")
public class ThymeleafProperties {

	private static final Charset DEFAULT_ENCODING = StandardCharsets.UTF_8;

	public static final String DEFAULT_PREFIX = "classpath:/templates/";

	public static final String DEFAULT_SUFFIX = ".html";
只要我们把HTML页面放在classpath:/templates/,thymeleaf就能自动渲染;
简单使用
@Controller
public class DemoController {

    @Autowired
    private HttpServletRequest request;

    @RequestMapping("/success")
    public String success() {
        request.setAttribute("hello", "你好");
        request.setAttribute("hello2", "<h1>你好</h1>");
        request.setAttribute("userData", Arrays.asList("李四","王五","张三"));
        return "success";
    }

}
<!DOCTYPE html>
<html lang="en" xmlns:th="http://www.thymeleaf.org">

<head>
    <meta charset="UTF-8">
    <title>Title</title>
</head>

<body>
    <h1>成功!</h1>
    <!--th:text 将div里面的文本内容设置为   转义-->
    <div th:text="${hello2}">这是显示欢迎信息</div>

    <!--th:utext 不转义-->
    <div th:utext="${hello2}"></div>

    <hr />

    <!--th:each 循环一个一个输出-->
    <h1 th:text="${user}" th:each="user:${userData}"></h1>

    <hr />

    <!--th:each 循环一次输出-->
    <h1>
        <span th:each="user:${userData}">[[${user}]],</span>
    </h1>

</body>

</html>
xmlns:th=“http://www.thymeleaf.org” 这个用于写的时候,标签有提示。
注意: 用这个模板感觉好处是,如果前端做了一个页面出来了, 我们可以不加入thymeleaf的标签的话,那么他就是显示原网页,加入后,直接替换里面的文字改为动态化。这个用于前端和后端的分离是很好的。
扩展SpringMVC
编写一个配置类(@Configuration),是WebMvcConfigurerAdapter类型;不能标注@EnableWebMvc
既保留了所有的自动配置,也能用我们扩展的配置;
//使用WebMvcConfigurerAdapter可以来扩展SpringMVC的功能
@Configuration
public class MyMvcConfig extends WebMvcConfigurerAdapter {

    @Override
    public void addViewControllers(ViewControllerRegistry registry) {
       // super.addViewControllers(registry);
        //浏览器发送 /atguigu 请求来到 success
        registry.addViewController("/atguigu").setViewName("success");
    }

   //所有的WebMvcConfigurerAdapter组件都会一起起作用
    @Bean //将组件注册在容器
    public WebMvcConfigurerAdapter webMvcConfigurerAdapter(){
        WebMvcConfigurerAdapter adapter = new WebMvcConfigurerAdapter() {
            @Override
            public void addViewControllers(ViewControllerRegistry registry) {
                registry.addViewController("/").setViewName("login");
                registry.addViewController("/index.html").setViewName("login");
            }

           //注册拦截器
            @Override
            public void addInterceptors(InterceptorRegistry registry) {
                //super.addInterceptors(registry);
                //静态资源;  *.css , *.js
                //SpringBoot已经做好了静态资源映射
                registry.addInterceptor(new LoginHandlerInterceptor()).addPathPatterns("/**")
                        .excludePathPatterns("/index.html","/","/user/login");
            }
        };
        return adapter;
    }
}
WebMvcConfigurerAdapter 这个接口里面有很多可以重写的抽象方法。上面的就可以定义以这个/atguigu请求的都到转到success的页面中。
多请求映射
 @RequestMapping({"/success","/"})
    public String success() {
        request.setAttribute("hello", "你好");
        request.setAttribute("hello2", "<h1>你好</h1>");
        request.setAttribute("userData", Arrays.asList("李四","王五","张三"));
        return "success";
    }
引入资源

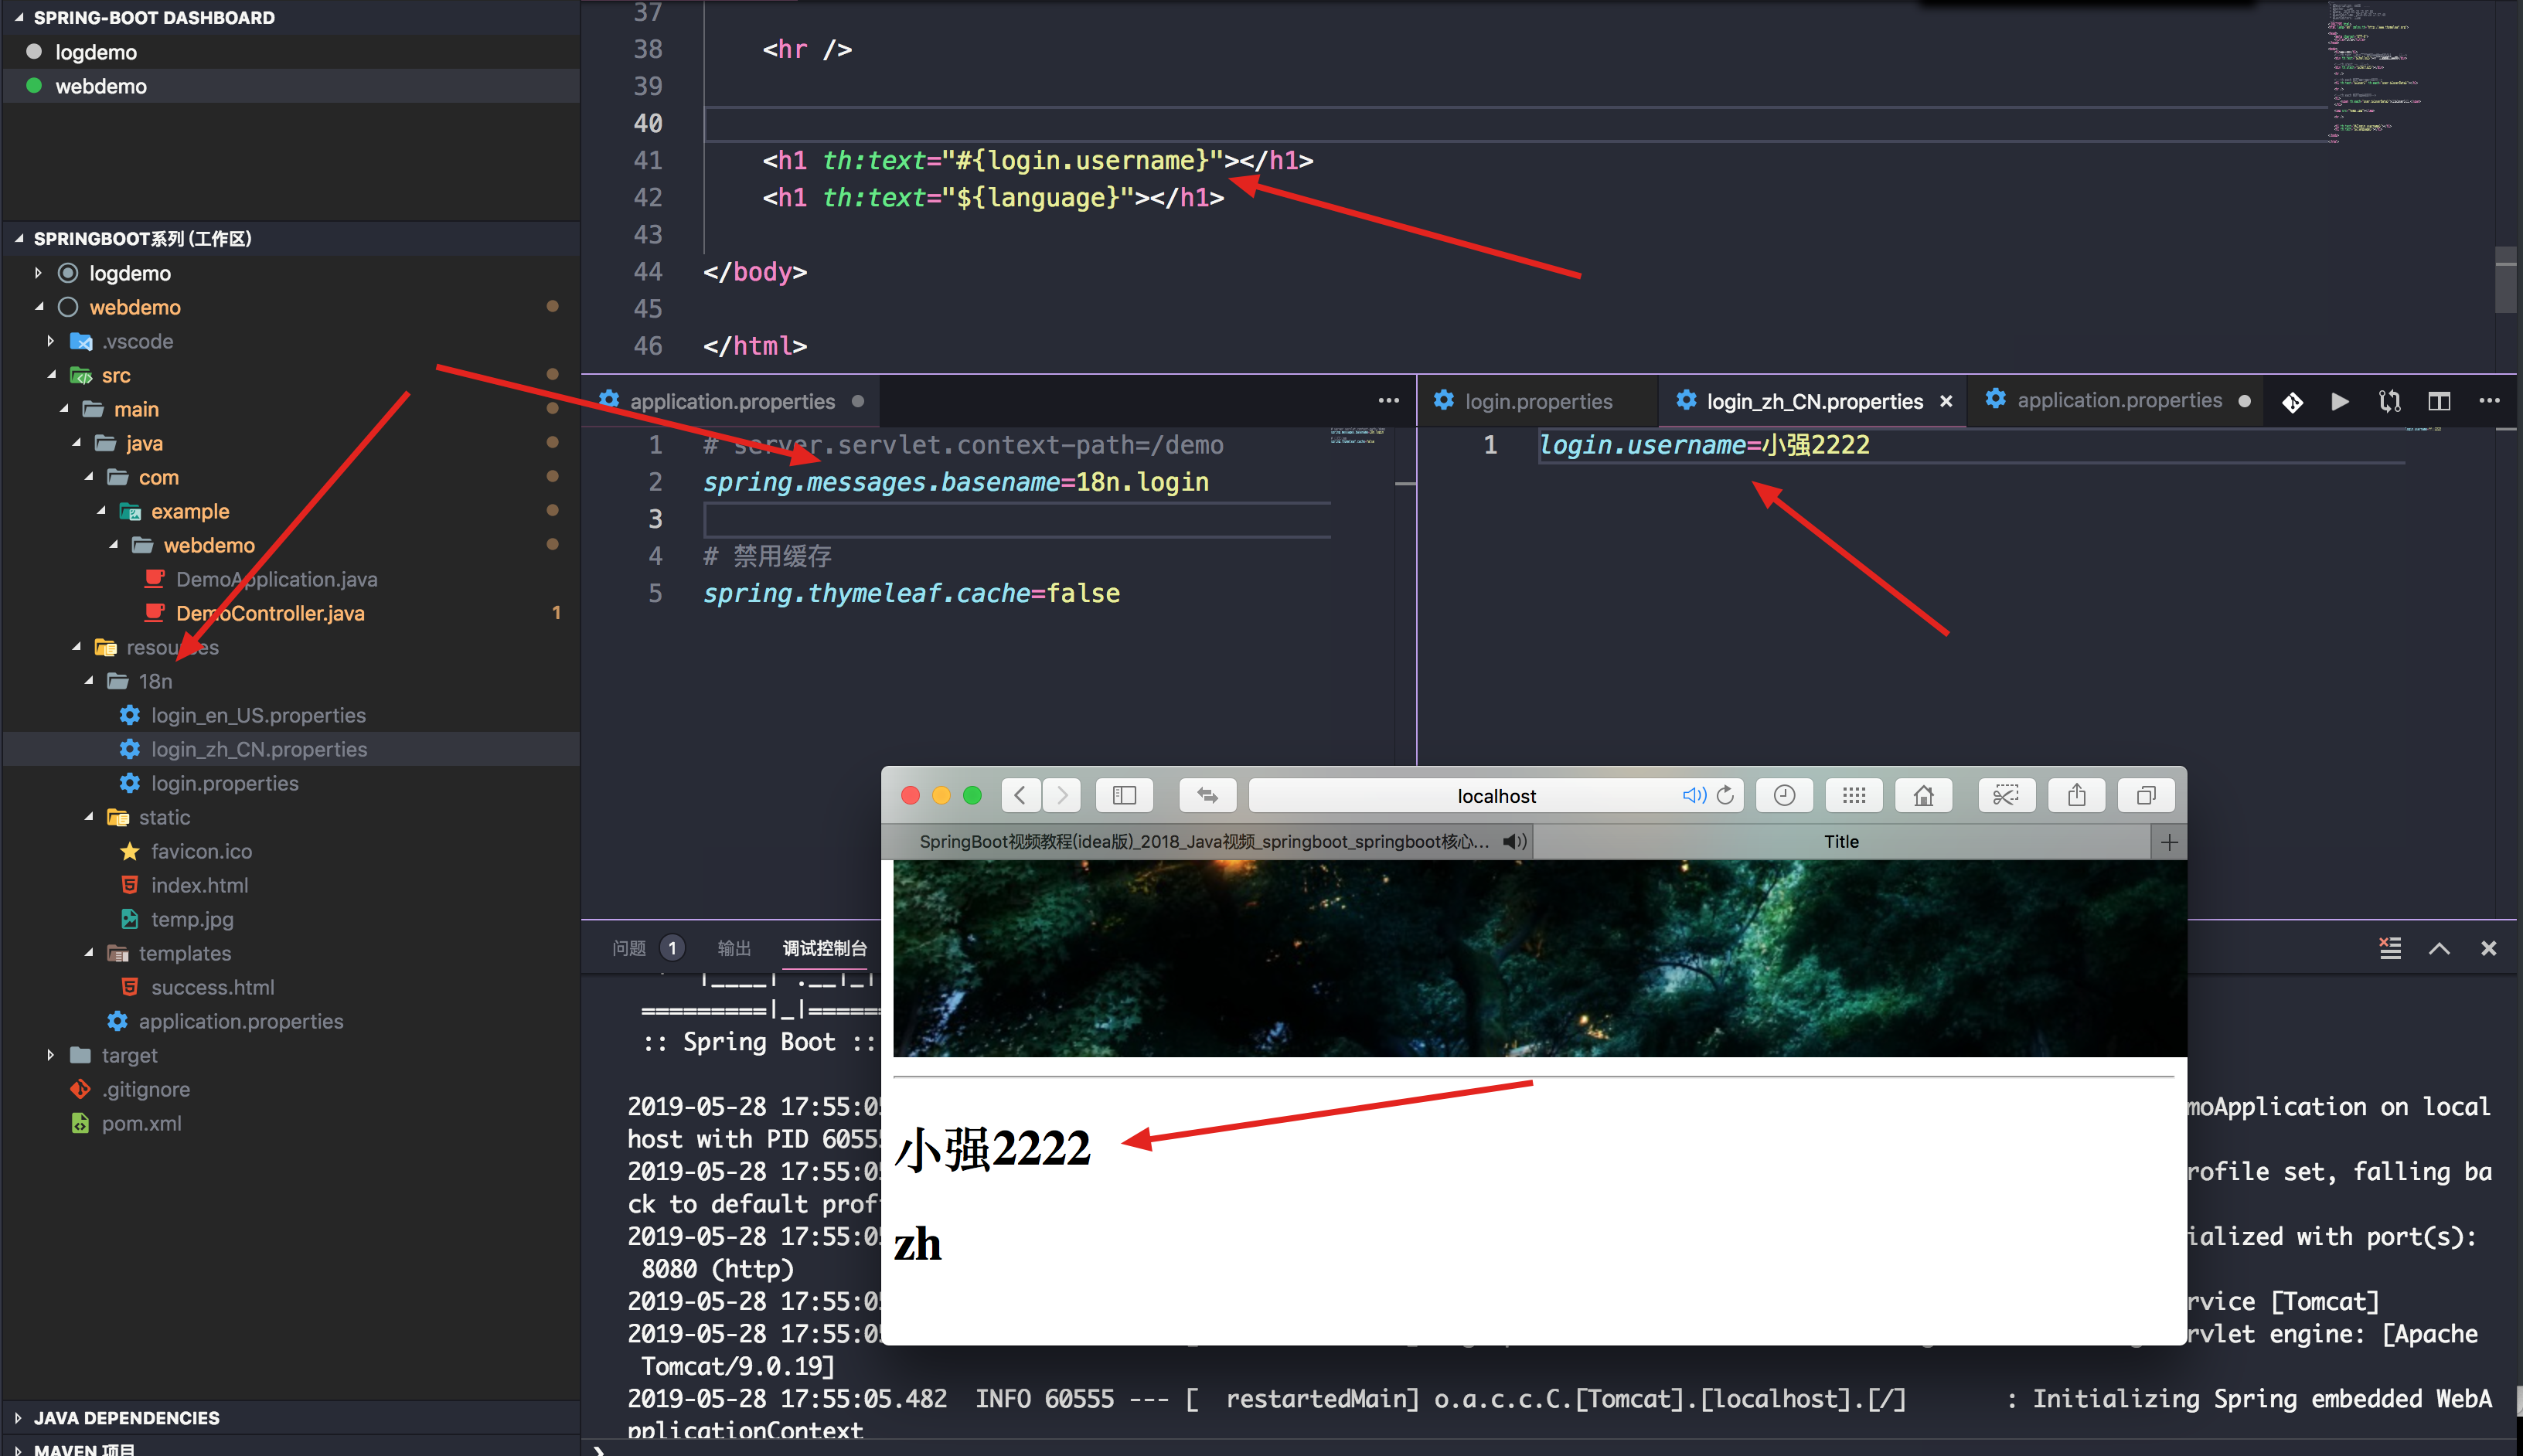
国际化
自定义拦截器
 * 登陆检查,
 */
public class LoginHandlerInterceptor implements HandlerInterceptor {
    //目标方法执行之前
    @Override
    public boolean preHandle(HttpServletRequest request, HttpServletResponse response, Object handler) throws Exception {
        Object user = request.getSession().getAttribute("loginUser");
        if(user == null){
            //未登陆,返回登陆页面
            request.setAttribute("msg","没有权限请先登陆");
            request.getRequestDispatcher("/index.html").forward(request,response);
            return false;
        }else{
            //已登陆,放行请求
            return true;
        }

    }

    @Override
    public void postHandle(HttpServletRequest request, HttpServletResponse response, Object handler, ModelAndView modelAndView) throws Exception {

    }

    @Override
    public void afterCompletion(HttpServletRequest request, HttpServletResponse response, Object handler, Exception ex) throws Exception {

    }
}
RestFul风格
使用Rest前,首先说一说Rest请求方式的好处,首先就是面向资源URI,即http请求的路径,Rest规定中要求URI各层只能用名词不用动词,这样相比传统的get请求有利于传输数据的稳定性,数据的操作流程不会被人轻易看破,也便于团队开发,各种URI一目了然;再通过固定的请求方式,对URI中的资源进行各种操作,常用的有:
URI: /资源名称/资源标识 HTTP请求方式区分对资源CRUD操作
| 普通CRUD(uri来区分操作) | RestfulCRUD | |
|---|---|---|
| 查询 | getEmp | emp—GET @GetMapping(value=“path”) |
| 添加 | addEmp?xxx | emp—POST @PostMapping(value=“path”) |
| 修改 | updateEmp?id=xxx&xxx=xx | emp/{id}—PUT @PutMapping(value=“path/{id}") |
| 删除 | deleteEmp?id=1 | emp/{id}—DELETE @DeleteMapping |
前端需要PUT,DELETE提交的时候, 设置nginx的配置文件就好了。
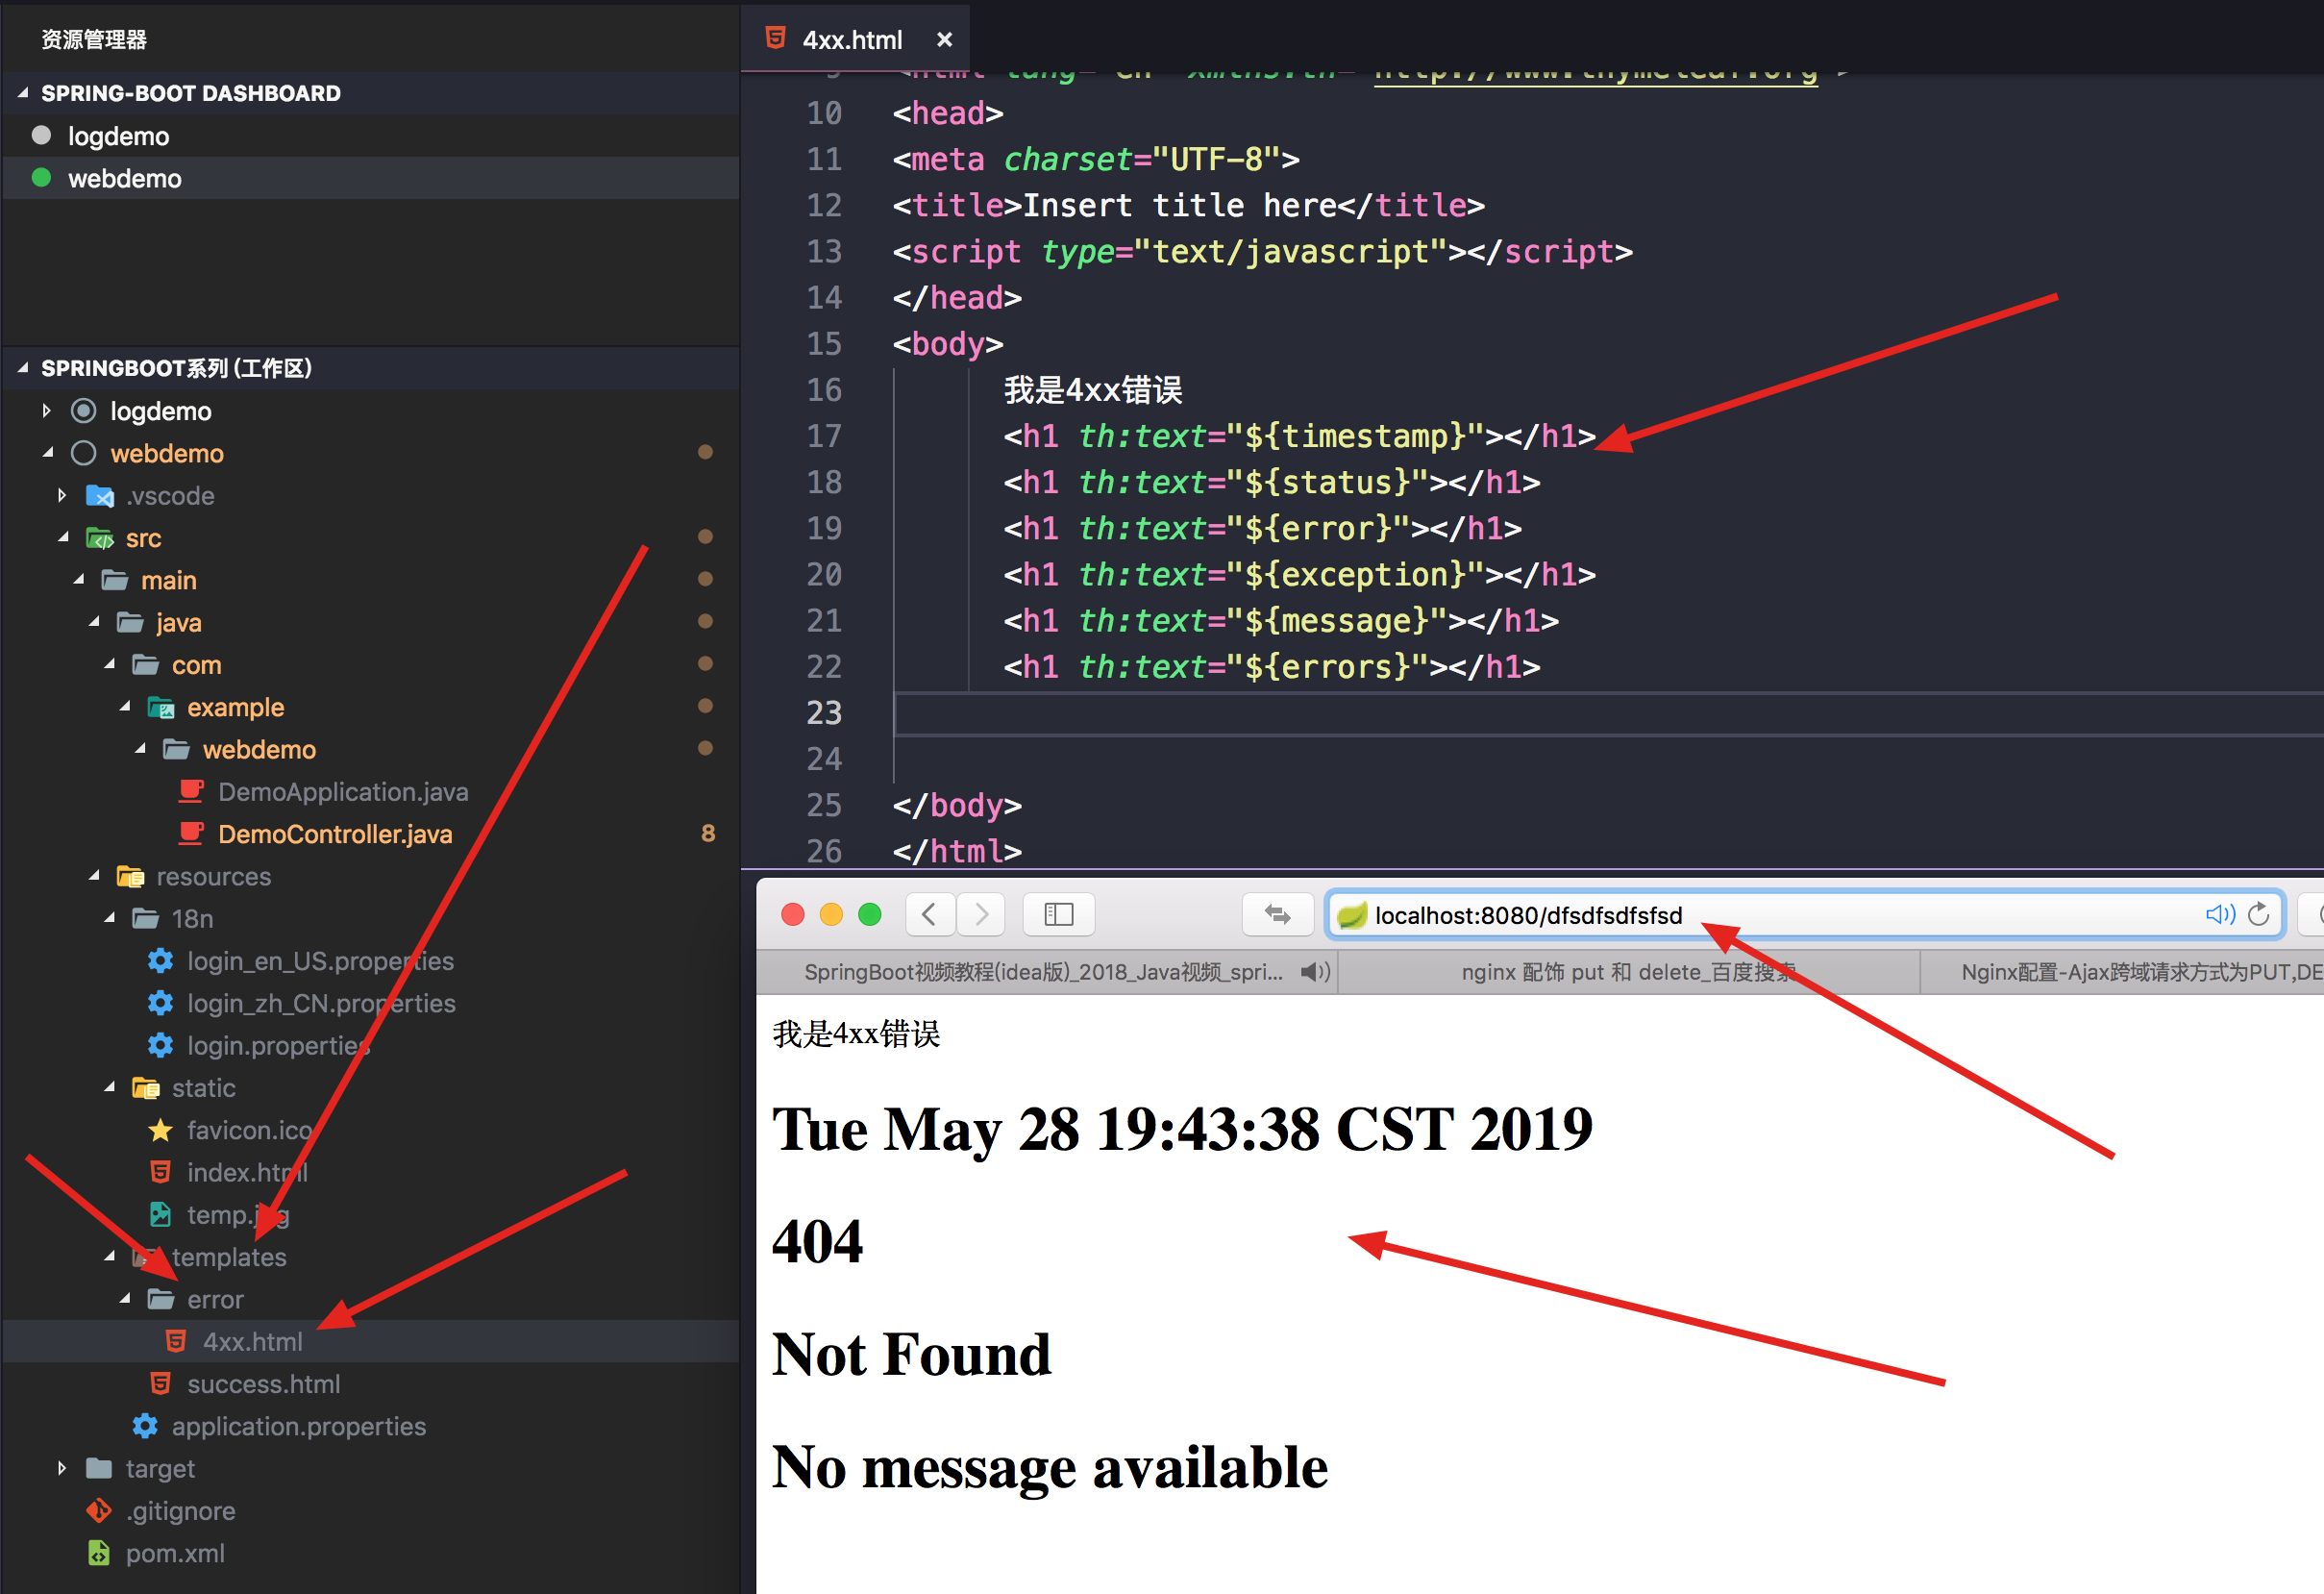
定制错误的页面
有模板引擎的情况下
【将错误页面命名为 错误状态码.html 放在模板引擎文件夹里面的 error文件夹下】,发生此状态码的错误就会来到 对应的页面;我们可以使用4xx和5xx作为错误页面的文件名来匹配这种类型的所有错误,精确优先(优先寻找精确的状态码.html);
#页面能获取的信息;
timestamp:时间戳
status:状态码
error:错误提示
exception:异常对象
message:异常消息
errors:JSR303数据校验的错误都在这里
没有模板引擎
模板引擎(也就是templates文件夹)找不到这个错误页面,静态资源文件夹下找;
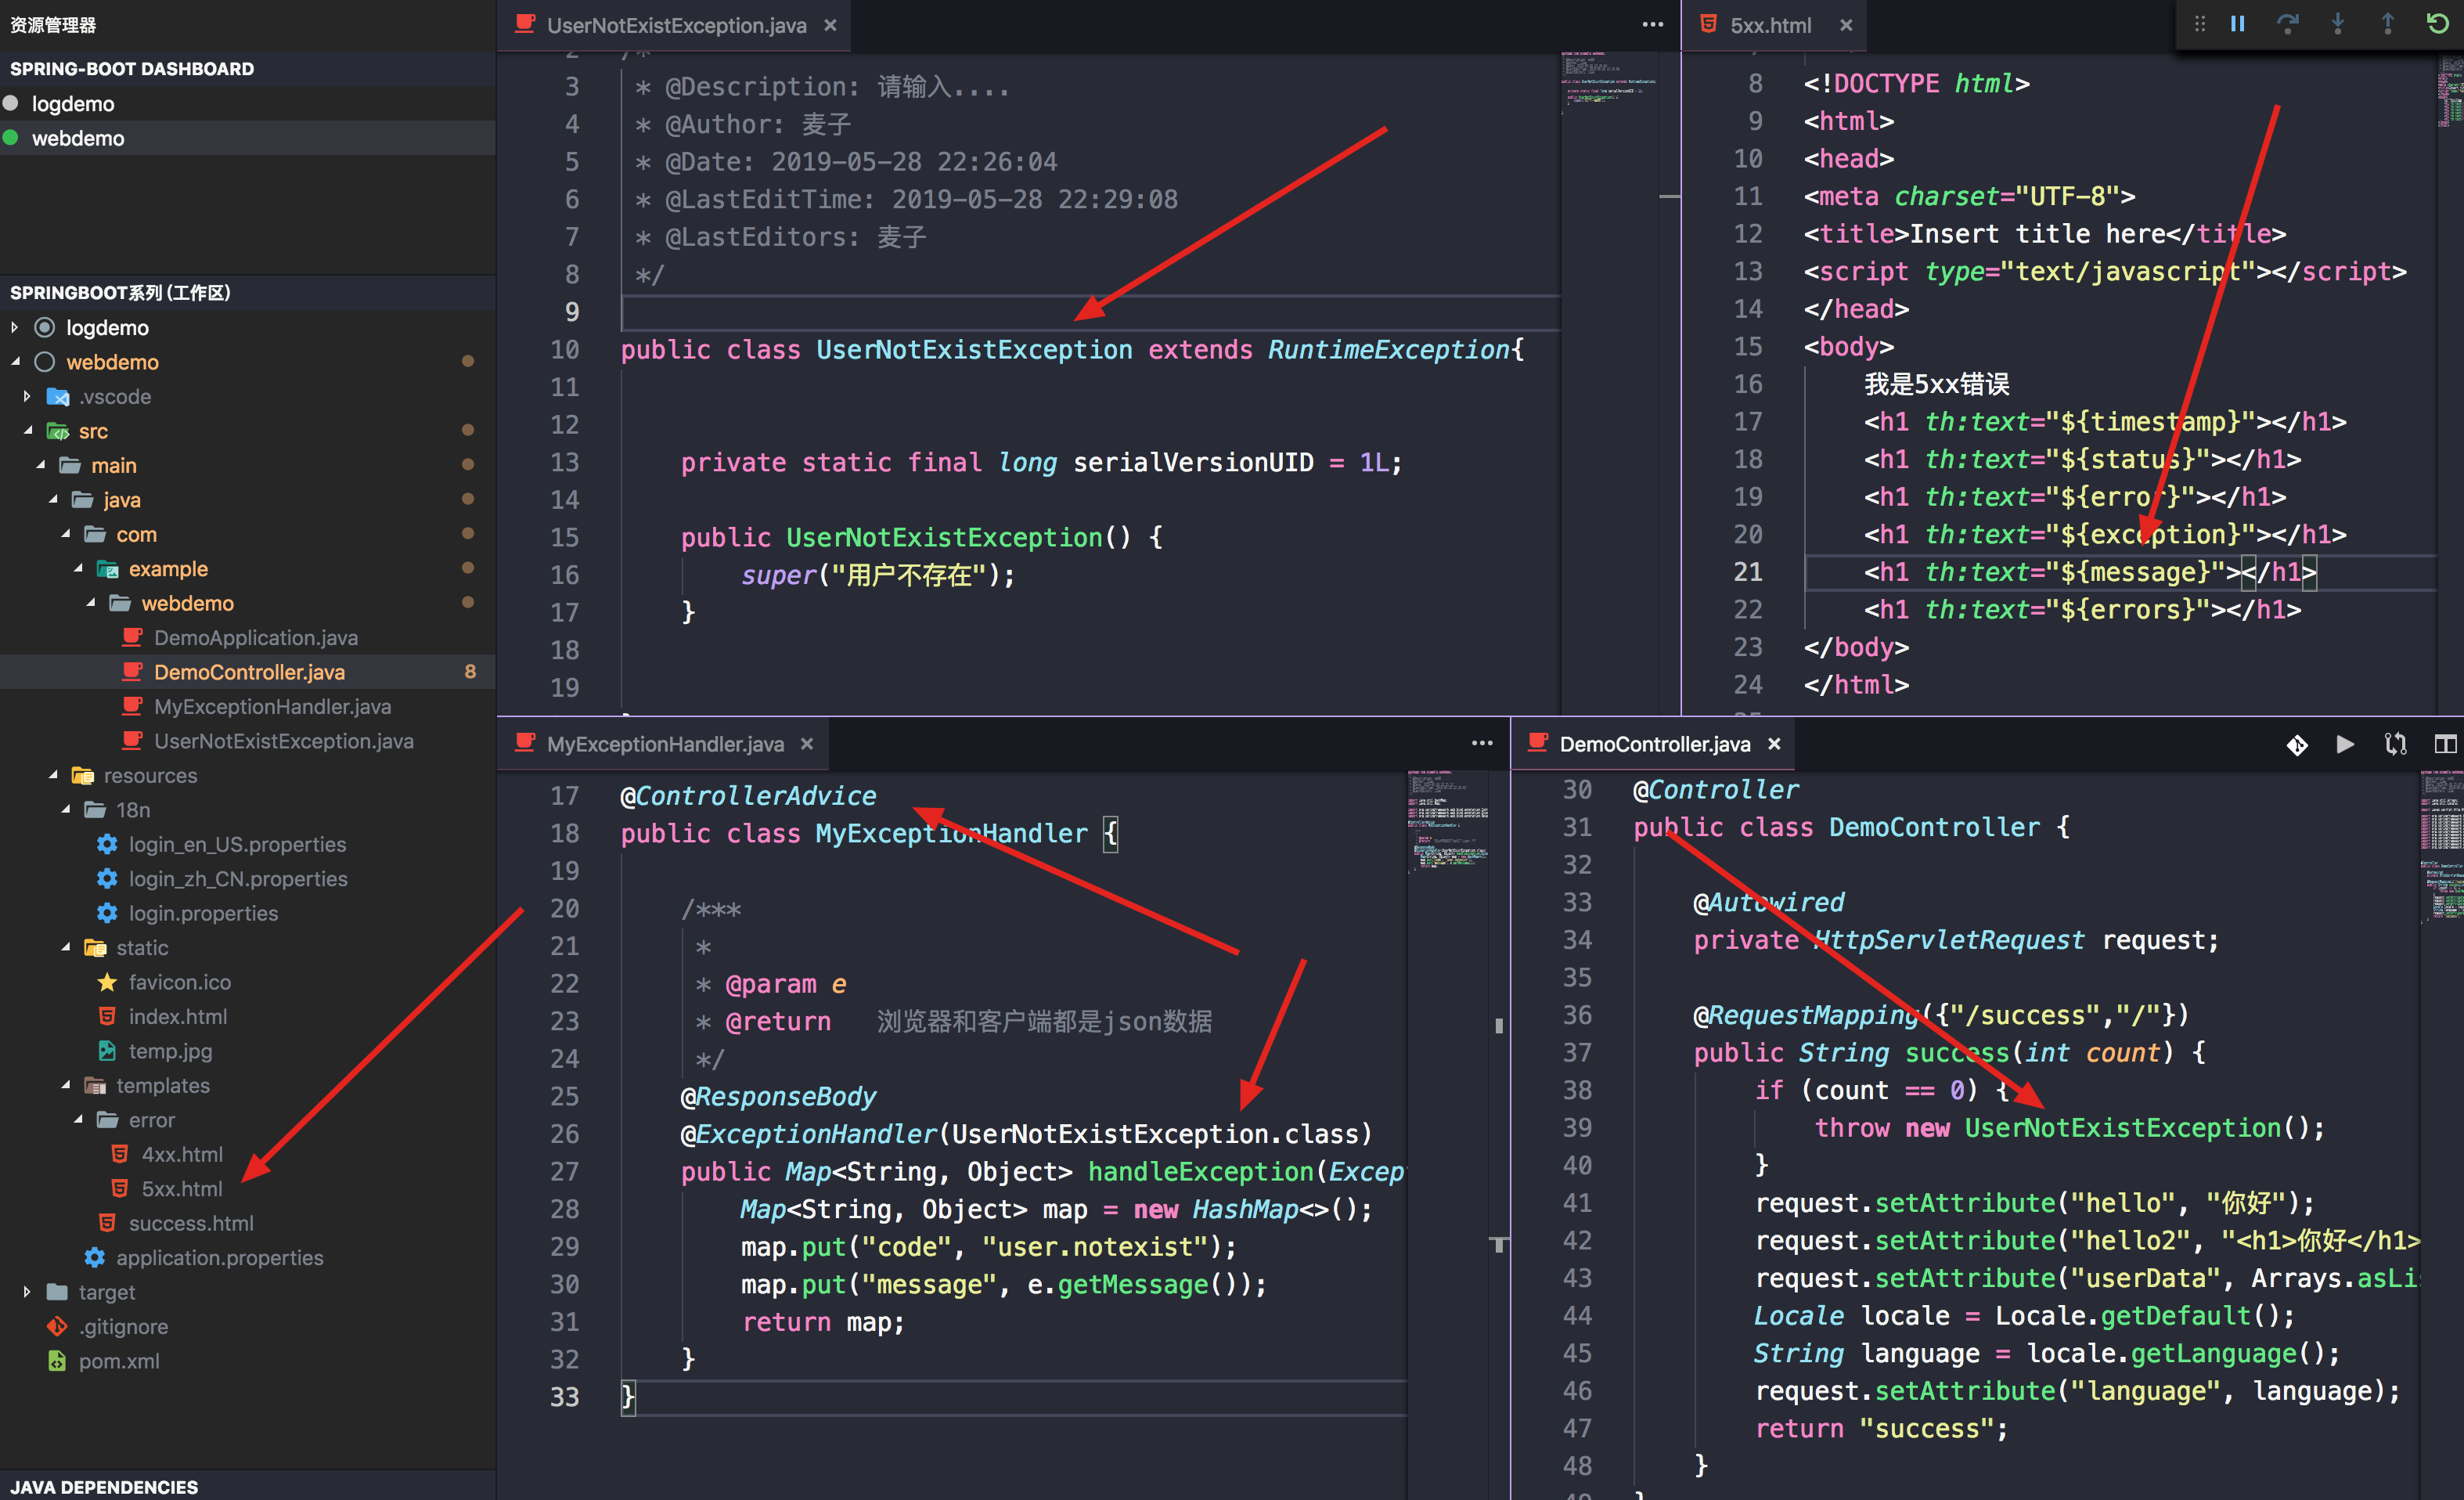
异常统一处理
效果如下:
{
   "code":"user.notexist",
   "message":"用户不存在"
}
处理自定义异常代码
@ControllerAdvice
public class MyExceptionHandler {

    /***
     *
     * @param e
     * @return   浏览器和客户端都是json数据
     */
    @ResponseBody
    @ExceptionHandler(UserNotExistException.class)
    public Map<String, Object> handleException(Exception e) {
        Map<String, Object> map = new HashMap<>();
        map.put("code", "user.notexist");
        map.put("message", e.getMessage());
        return map;
    }
}
自动适应web和客户端异常代码
 /**
     *
     * @param e
     * @param request
     * @return  自动适应 web端和客户端端处理,也就是web端显示的错误信息和客户端返回的错误信息不一样
     */
    @ExceptionHandler(UserNotExistException.class)
    public String handleException(Exception e, HttpServletRequest request){
        Map<String,Object> map = new HashMap<>();
        //传入我们自己的错误状态码  4xx 5xx,否则就不会进入定制错误页面的解析流程
        /**
         * Integer statusCode = (Integer) request
         .getAttribute("javax.servlet.error.status_code");
         */
        request.setAttribute("javax.servlet.error.status_code",500);
        map.put("code","user.notexist");
        map.put("message",e.getMessage());
        request.setAttribute("resultData", map);
        //转发到/error
        return "forward:/error";
    }
出现错误以后,会来到/error请求,会被BasicErrorController处理,响应出去可以获取的数据是由getErrorAttributes得到的。
import org.springframework.boot.web.servlet.error.DefaultErrorAttributes;
import org.springframework.stereotype.Component;
import org.springframework.web.context.request.RequestAttributes;
import org.springframework.web.context.request.WebRequest;

//给容器中加入我们自己定义的ErrorAttributes
@Component
public class MyErrorAttributes extends DefaultErrorAttributes {

    @Override
    public Map<String, Object> getErrorAttributes(WebRequest requestAttributes, boolean includeStackTrace) {
        Map<String, Object> map = super.getErrorAttributes(requestAttributes, includeStackTrace);
        map.put("company","atguigu");
        Map<String,Object> data = (Map<String, Object>) requestAttributes.getAttribute("resultData",
                RequestAttributes.SCOPE_REQUEST);
        map.put("result", data);
        return map;
    }
}
显示效果如下:
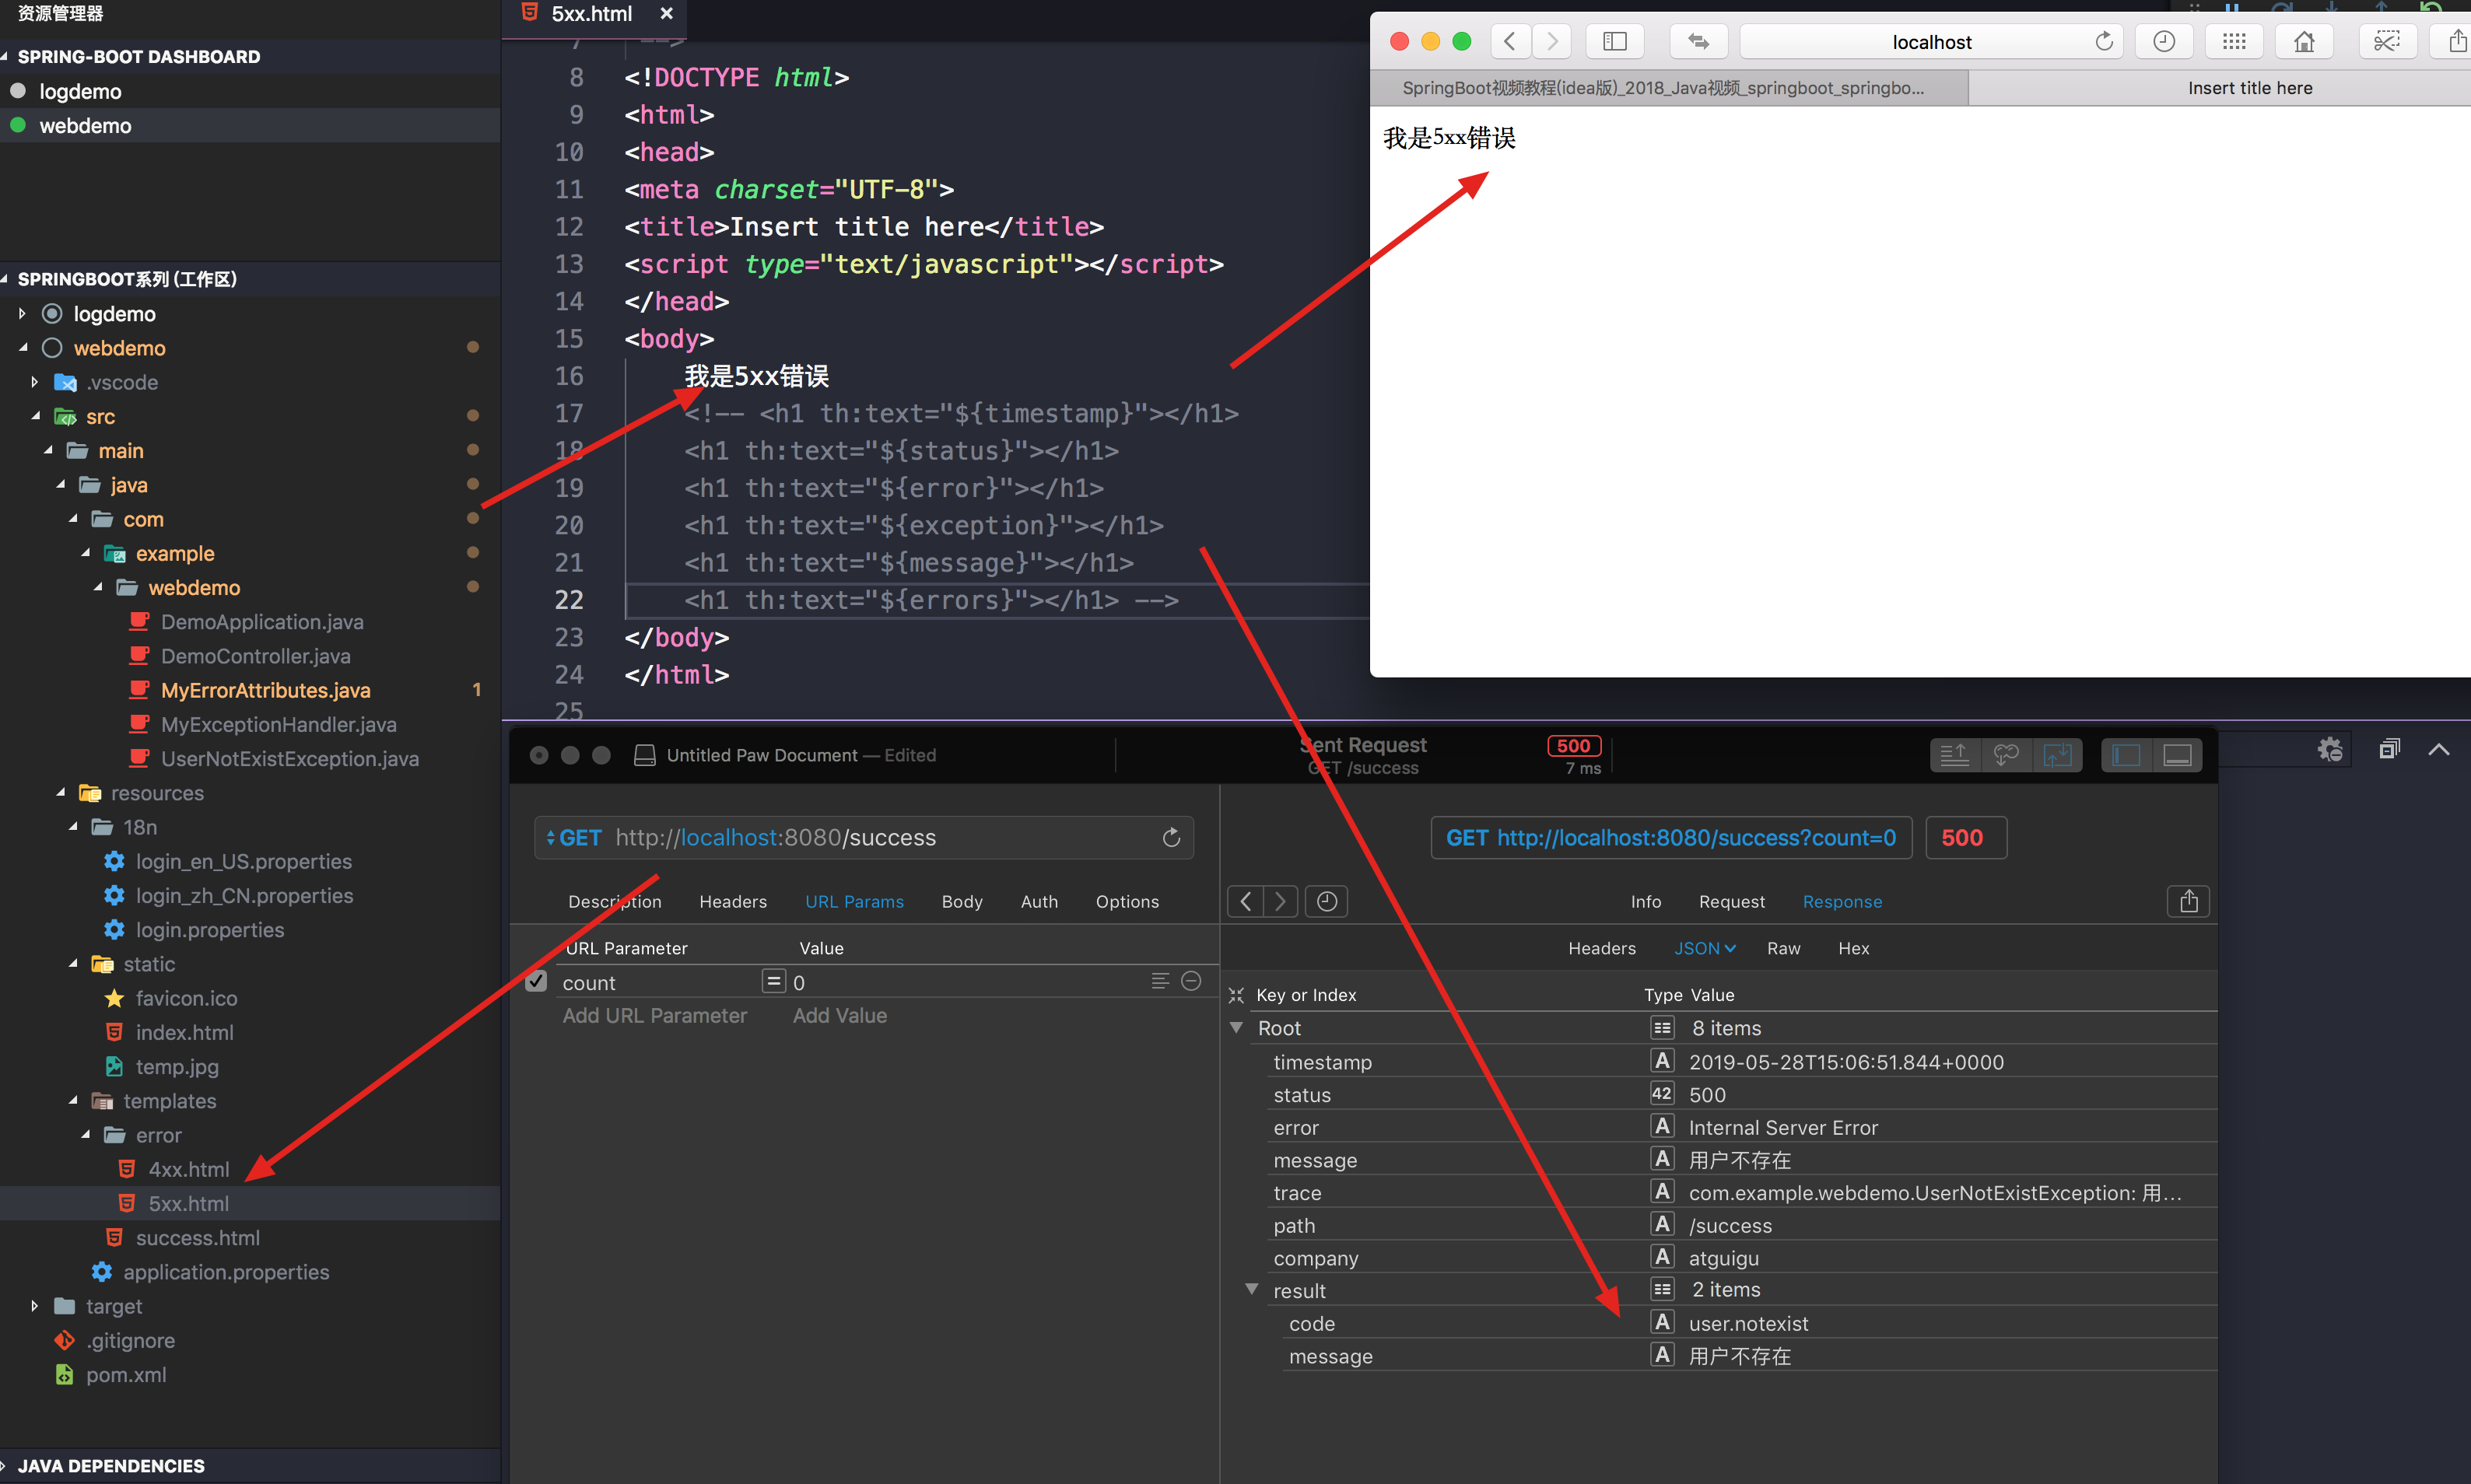
注意:在我们开发中, 500错误可以自定义一个页面给用户看,客户端的调用接口时候就给他看错误json日志。
配置嵌入式Servlet容器
tomcat就是一个servlet容器。springboot也就是默认用这个。
server.port=8081
server.context-path=/crud
server.tomcat.uri-encoding=UTF-8

#通用的Servlet容器设置
server.xxx
#Tomcat的设置
server.tomcat.xxx
注册Servlet三大组件
Servlet
public class MyServlet extends HttpServlet{

    private static final long serialVersionUID = 1L;

    @Override
    protected void doGet(HttpServletRequest req, HttpServletResponse resp) throws ServletException, IOException {
        doPost(req, resp);
    }

    @Override
    protected void doPost(HttpServletRequest req, HttpServletResponse resp) throws ServletException, IOException {
        resp.getWriter().write("hello,my servlet");
    }

}
Filter
public class MyFifter implements Filter {

    @Override
    public void init(FilterConfig filterConfig) throws ServletException {
        Filter.super.init(filterConfig);
    }

    @Override
    public void doFilter(ServletRequest request, ServletResponse response, FilterChain chain)
            throws IOException, ServletException {
            System.out.println("filter execute...");
            chain.doFilter(request, response);

    }

    @Override
    public void destroy() {
        Filter.super.destroy();
    }

}
Listener
public class MyListener implements ServletContextListener{

     @Override
     public void contextInitialized(ServletContextEvent sce) {
         System.out.println("tomcat 已经启动");
     }

     @Override
     public void contextDestroyed(ServletContextEvent sce) {
         System.out.println("tomcat 已经停止");
     }

}
注入到容器中
@Configuration
public class MyServiceConfig {

    @Bean
    public ServletRegistrationBean myServlet() {
        ServletRegistrationBean registrationBean = new ServletRegistrationBean(new MyServlet(), "/myServlet");
        return registrationBean;
    }

    @Bean
    public FilterRegistrationBean myFilter() {
        FilterRegistrationBean registrationBean = new FilterRegistrationBean();
        registrationBean.setFilter(new MyFifter());
        registrationBean.setUrlPatterns(Arrays.asList("/hello", "/myServlet"));
        return registrationBean;
    }

    @Bean
    public ServletListenerRegistrationBean myListener() {
        ServletListenerRegistrationBean<MyListener> registrationBean = new ServletListenerRegistrationBean<>(
                new MyListener());
        return registrationBean;
    }
}
注意:需要一些详细的属性设置,在这里也可以进行设置处理。
替换为其他嵌入式Servlet容器
Tomcat(默认使用)
<dependency>
   <groupId>org.springframework.boot</groupId>
   <artifactId>spring-boot-starter-web</artifactId>
   引入web模块默认就是使用嵌入式的Tomcat作为Servlet容器;
</dependency>
Jetty
<!-- 引入web模块 -->
<dependency>
   <groupId>org.springframework.boot</groupId>
   <artifactId>spring-boot-starter-web</artifactId>
   <exclusions>
      <exclusion>
         <artifactId>spring-boot-starter-tomcat</artifactId>
         <groupId>org.springframework.boot</groupId>
      </exclusion>
   </exclusions>
</dependency>

<!--引入其他的Servlet容器-->
<dependency>
   <artifactId>spring-boot-starter-jetty</artifactId>
   <groupId>org.springframework.boot</groupId>
</dependency>
使用外置的Servlet容器
嵌入式Servlet容器:应用打成可执行的jar
优点:简单、便携;
缺点:默认不支持JSP、优化定制比较复杂。
外置的Servlet容器
外面安装Tomcat—应用war包的方式打包;
1)、必须创建一个war项目;(利用idea创建好目录结构)
2)、将嵌入式的Tomcat指定为provided;
<dependency>
   <groupId>org.springframework.boot</groupId>
   <artifactId>spring-boot-starter-tomcat</artifactId>
   <scope>provided</scope>
</dependency>
3)、必须编写一个SpringBootServletInitializer的子类,并调用configure方法
public class ServletInitializer extends SpringBootServletInitializer {

   @Override
   protected SpringApplicationBuilder configure(SpringApplicationBuilder application) {
       //传入SpringBoot应用的主程序
      return application.sources(SpringBoot04WebJspApplication.class);
   }

}
4)、启动服务器就可以使用;
原理
jar包:执行SpringBoot主类的main方法,启动ioc容器,创建嵌入式的Servlet容器;
war包:启动服务器,服务器启动SpringBoot应用【SpringBootServletInitializer】,启动ioc容器;
自定义Spring Boot的父POM
	<parent>
		<artifactId>mycloud</artifactId>
		<groupId>maizi.cloud</groupId>
		<version>1.0-SNAPSHOT</version>
	</parent>
	<modelVersion>4.0.0</modelVersion>
	<artifactId>consumer-9001</artifactId>

	<dependencyManagement>
		<dependencies>
			<dependency>
				<!-- Import dependency management from Spring Boot -->
				<groupId>org.springframework.boot</groupId>
				<artifactId>spring-boot-dependencies</artifactId>
				<version>2.1.4.RELEASE</version>
				<type>pom</type>
				<scope>import</scope>
			</dependency>
		</dependencies>
	</dependencyManagement>
「真诚赞赏,手留余香」

真诚赞赏,手留余香
使用微信扫描二维码完成支付